Since the 1960s, Coordinate Measuring Machines (CMM) have evolved enormously, going from simple mechanical devices to highly sophisticated systems.
These tools have revolutionized the inspection of industrial parts, reaching unprecedented levels of precision and efficiency in three-dimensional measurement. Below is an analysis of the evolution of these machines from the 60s to the present.
50s and 60s – Three-Dimensional Measuring Machines
The MMC with automatic reading have a history of about 60 years. Previously, in the 40s of the 20th century, there were 3-axis three-dimensional measuring machines, but with Vernier scales to provide the coordinates of each axis.
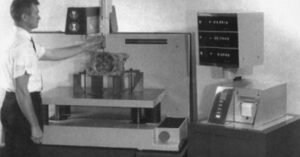
Is in 1959 when the first coordinate measuring machine with automatic reading appears at the Machine Tool Exhibition in Paris. It was manufactured by Ferranti, a British company known for having developed the first commercial computer in 1951.
This first model only had two axes and was specifically designed to accurately measure the geometry of small parts and components in the military industry. The first three-axis machine was already developed in the 1960s, but it is unknown who was the first manufacturer of it. Ferranti of Scotland, and DEA of Italy, claim that honor.
In this decade, the development of coordinate measuring machines became popular among large companies in most developed countries (USA, Japan, Germany, France), producing and marketing MMC for industry.
The probes used at this time were purely mechanical, fitted into special housings to remain motionless and be able to measure specific points on objects. These probes easily measured planes, cylinders, or round surfaces, but were impossible to reposition to measure various shapes and sizes.
1970s – Three-Dimensional Measuring Machines
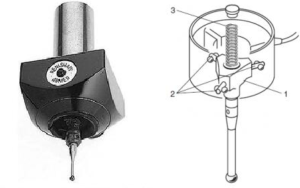
The co-founder of Renishaw, Sir David McMurtry, invented the contact trigger probe (Touch Trigger Probe) in 1970, being Zeiss the first to incorporate it in 1972. This type of probe allows the route to be exceeded after automatic detection by contact.
This new technology allowed the Olympus engines used in the Concorde to pass specific design requirements. This invention resulted a true revolution for three-dimensional metrology, and opened a world of opportunities for precision and automatic measurements of both individual components and complete assemblies.
The system consists of a probe with a housing for three perpendicular bars that each make contact with two spheres. A small voltage is applied and the resistance of the contacts is measured, thereby accurately identifying the moment at which the contact breaks. Then the “freezing” of the scale positions of the three axes occurs. The system has a spring that gives it flexibility, preventing it from being damaged when exceeding the measurement path on the piece, and from returning to its position once the contact has ended.
In 1973, Zeiss introduced the 3D measuring probe. This probe consisted of three stacked axes, each with an actuator to probe force generation and an inductive sensor for displacement measurement.
It is also in 1973 when Sir David McMurtry and John Deer founded Renishaw, with the aim of exploiting the patent of the contact trigger probe, subsequently becoming a reference in the world of metrology for its disruptive innovations.
In 1974 the German firm Wild Leitz GmbH developed the first computer controlled coordinate measuring machine.
1980s – Three-Dimensional Measuring Machines
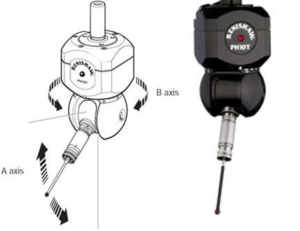
In the early 1980s, Renishaw once again provides a fundamental evolution in the sector. Expands the capabilities of CMMs by introducing robotic head for probing probes. In addition, they develop other advances such as automatic probe exchange systems, continuous scanning or palpating probes, etc...
CMM hardware evolved dramatically between 1960 and 1988, but core technology behind coordinate measuring machines has remained practically static in the last 30 years.
The only notable feature is the use of synthetic materials instead of traditional granite and steel, thus achieving a lighter mechanical structure and better behavior in the face of temperature changes, reducing deformations and slightly improving precision and repeatability.
But this technology has not been universally accepted, nor does it represent any revolution in the market for three-dimensional measuring machines.
The great evolutions since the 80s have come through introduction and evolution of digital CNC controller, providing more precise displacement of the axes and allowing circular movements instead of only linear ones.
In addition, it was possible to operate the machine with much higher accelerations and speeds. But none of these innovations come from the CMM industry itself. It is an addition to the machine tool sector that has been using CNC to control machining machines and lathes since the 1950s.
Another great innovation that has allowed greater progress in the performance of CMMs, both in precision, repeatability and speed of operation, is the incorporation of reading rules and linear encoders.
At this time, the Swiss company Metromec invent the metrology software on PC, which would mark the main lines of development of the following decades.
90s – Three-Dimensional Measuring Machines
In the 90s, the PCs experience a large price reduction and They spread in the business world and to coordinate measurement machines. An improvement in precision is obtained, by allowing adequate calculations to compensate for geometric errors, and a reduction in inspection cost.
It is from this time when the main evolutions of coordinate measurement machines fall on el metrology software. Progress is made in programming, automation, geometric calculations, software compensation, ease and speed of operation, automatic production of metrology reports, etc.
21st Century – Three-Dimensional Measuring Machines
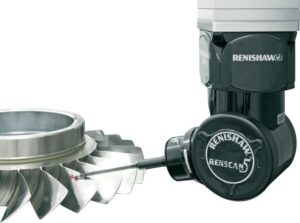
At the beginning of the century, Renishaw, once again, revolutionizes the three-dimensional metrology industry by introducing an important innovation: 5-axis measurement (Renscan5) .
Until this moment, the movement of the probe to perform the probing was produced by the movement of the 3 axes of the machine. The 4th and 5th axis, corresponding to two turns of the head, were used only to position the probe. But with the new 5-axis technology, the rotations of the head are used to perform scanning.
This allows the large inertia produced by the displacement of the masses of the X, Y or Z axes to be eliminated, having to only move the much smaller mass corresponding to the head, probe and probe. As a consequence, it can be operated with higher speeds and accelerations, achieving great time savings in measurement work.
In this age laser scanners coupled to coordinate measuring machines are considerably improved. And systems such as portable scanners or articulated arms are beginning to be serious alternatives to three-dimensional measuring machines.
I also know Metrology software continues to evolve taking advantage of the increasingly better calculation capabilities of PCs to provide greater facilities for both user interface and programming, reporting, CAD, statistical control... In recent years, progress has been made towards integrating measurement results with systems. of the company in an Industry 4.0 strategy.
Currently there is a wide range of Three-Dimensional Measuring Machines, of different sizes, models and brands, both manual and automatic. Check the article 6 keys to choosing your Coordinate Measuring Machine to know all the details about the types of machines, differences between manual and automatic... and to know how not to make a mistake when choosing the most suitable machine.
In Teciman we have a large catalog of Coordinate Measuring Machines Coord3 and Renewed by our technicians (machines just as functional as a new one but cheaper). Contact us by email teciman@teciman.com and the telephone (+34) 947 20 91 41. And follow us on LinkedIn Téciman_International so you don't miss anything.


